You'll need an image manipulation software, I used GIMP 2.6.2. Its open source and freely available.
1] First thing to do is to take two pictures of yours. While taking the pictures utmost care must be taken that the camera (and other objects in the scene) are not moved. Try to make sure that everything else except you in the pictures should remain still. For example following are the two pictures that Parag gave me (resized to 1024x768):


2] Next thing you need to do is open these images in GIMP. You can use "File | Open as Layers" to open the two images as two layers. You should have something like this:
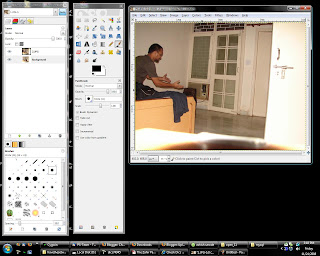
3] Hide the first layer (click on the eye against the first layer in the layers dialog)
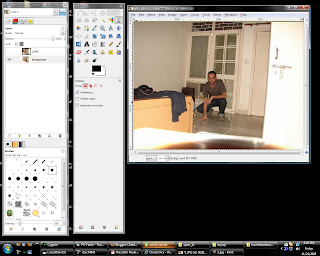
4] Take the "Scissors Select Tool" and use it to select the person in the second layer (you can also use "Free Select Tool") try to keep the selection close to the person.
5] Grow the selection using "Select | Grow" so that some more area around the person is selected. I grew the selection by 25px. You shoud have something as below:
6] Make the first layer visible (make sure the selection is not lost). Right click on the layer and select "Add layer mask". Select "White (full opacity)" in the dialog and click "Add". You should see that there is another white layer added to the right of the first layer.
7] Click on the layer mask added, select the "Bucket Fill Tool", make sure that foreground color is set to black and the selection is still there. Click inside the selection. This should fill the selected area on the layer mask with black colour. Also, the person in the second layer should become visible. You can lose the selection now.
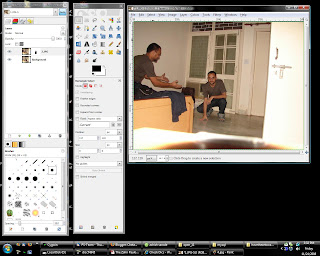
8] Its almost done, but there might be some sharp color changes around the second person because of the change in the lighting. To Fix this we will blur the layer mask a bit so that the colours of the two layers are blended. Select the layer mask and select gaussian blur from "Filter | Blur | Gaussian Blur". Select radius something less than how much we grew the selection, I used 22px.
9] Done!!

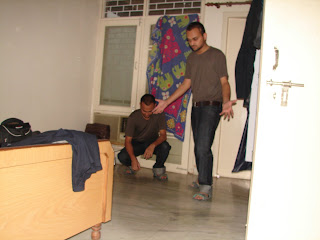
Some other images I made:
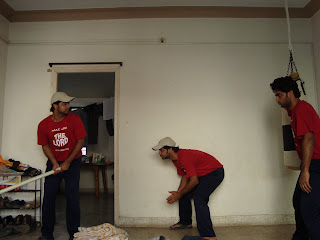
awesome job dude...cheers
ReplyDeleteYeah! liked it. Would like to add few more comments. If your digi cam supports buffered shots, simply increase the timeline and keep the camera still. That way there's lesser chance of background change.
ReplyDeleteBy records like to have a virtual judwa. lol
Thanks Chetan. Just created an image of me serving water to myself (gaon style).
ReplyDeleteIt is the first tut understandable I ever read about this item. Thank you Chetan!!
ReplyDeleteVery nice tutorial..looking forward to see more..:D
ReplyDeletePretty interesting.
ReplyDeleteI used it to create a picture of myself playing carroms, well, with myself.
Here it is
Thanks!
Sashi
Following the steps described by Chetan I tried creating duplicates. While it worked very well between the two images in standing position there is a significant contrast difference between the middle and the right image. I tried the blur action and even that did not work out. Does anyone know how to overcome the color contrast? or it is the Sunlight effect which is hard to overcome as I have noticed most of the duplicate images are indoors and there is no sunlight effect. I have posted the picture on this link with originals:
ReplyDeletewww.flickr.com/mr40d
Thanks for the tips and help!!!
Probably you can modify the original images a little so that the color difference is minimized, and then try to merge them.
ReplyDeleteCan anyone post picture tutorial for number 7 please sorry I am very new with these stuffs
ReplyDeleteThanks for the tutorial! It's really grat and simple! ;)
ReplyDeletethis is esier if you use layers
ReplyDeleteThank you so much for the tutorial! It's really fun and quite simple to do (after we have understood how it all works) Thanks again!! I love it!
ReplyDeleteHi there
ReplyDeleteI am having great difficulty with Step 7. Everytime I click on the Bucket Fill tool my selection vanishes. I am using a later version of Gimp (2.6.6) but can't imagine that if affects things that much. I tried looking for another tutorial but everyone seems to link to this one. So I know it must work and be very good! Very frustrating! Can anyone help me please?
hi dan, I broke my leg so i dont spend much time on my comp. anyways, the selection should not be lost when u click on the bucket fill tool, please check that u are not losing the selection on some previous step an u are clicking on the bucket fill tool and not any other tool. I know u would have probably checked these things but most of the times we do really silly mistakes :).
ReplyDeleteAnyway if that doesn't works try adding a layer mask and use "selection" option and tick invert mask, instead of "white (full opacity). this should add a layer mask awith the selection filled with black color.
HTH
thats really cool!
ReplyDeleteI searched for this tutorial a long time.
cool :-)
ReplyDeletethat is really awesome i have created an image me looking myself thanx for you past
ReplyDeleteWoow man, this tutorial is gourgeous... I really apreciate that you`ve made it public. Thanks!
ReplyDelete